Tuesday, October 4, 2016

Inkblot Rayon Sutton Top and Why to Skip Staystitching


After I finished the Dove blouse, I started working on another rayon v-neck top with a center front seam... Way to branch out, right?! A while back, I was looking at an email from Indiesew and they had this really interesting rayon for sale. I popped onto their website and there were only 2 yards of it left, so I grabbed them. That's so not my usual shopping style, I usually browse and browse and change my mind 100 times before buying something, but I really liked this and didn't want to lose out on it. If you were also looking at it and missed out, sorry!

Ignore the weird look on my face, I don't quite get the auto-timer on my camera yet!
It was described as a loose-weave, semi-sheer rayon challis, and in person it almost makes me think of a thicker gauze. It's very soft and airy, and it was great to wear in the 106 F temperatures we had down at Disneyland last week! I knew I wanted to make a loose shirt from this, without set-in sleeves, and something that needed 2 yards or less, of course. I found the Sutton Blouse pattern by True Bias (on Indiesew again), and it was exactly what I was hoping for.


Fabric
: 100% rayon loose-weave challis

Pattern Changes: Used interfacing instead of stay-stitching, otherwise none

New &/or Improved Techniques: After struggling with staystitching on the Dove top, I needed to find another technique to avoid getting a stretched out neckline on this Sutton top. On the loose, drapey rayon, my staystitches were basically gathering and/or distorting the neckline themselves no matter how much I messed with the tension. I did some research and found a few people saying that staystitching isn't the best technique in most cases to combat the issue of fabric stretching on the bias before you get it sewn into place. Instead, use stay tape or interfacing. Staystitching is recommended ALL the time for home sewists, but I think I'm going to rebel and avoid it as often as possible. I used strips of knit fusible interfacing and it worked SO MUCH BETTER.

What I Like: The ease of construction, the shape of the top, the French seams - as directed in the instructions so no need to figure out seam allowances, construction order, and/or when I need to do another finishing method! It would be great for pattern mixing or color blocking.

What I'd Change: Nothing. This is a top I would love to make again.


Please note the un-stretched out neckline above ^^^ It's probably my favorite feature!

Monday, September 19, 2016

Megan Nielsen Dove Blouse

I was very excited to get an email a while back about being a pattern tester for a Megan Nielsen pattern. I have admired her patterns for a long time. The pattern I was sent was the Dove blouse. I really like this pattern, and I keep thinking of new variations of it that I could make.

It was a little bright out when I was taking these! Haha
I chose this rayon challis (no longer available) from Fabric.com to use for my first version of this top. I wanted to just make the pattern as-is to get a good feel for it. I tend to alter patterns (and recipes) the first time I use them, but I wanted to give this a fair shot at simply being itself. My initial impression was that this was a very versatile pattern that could be altered in a number of ways, but it's very wearable in its original incarnation, too. It's been a great casual-but-not-too-casual shirt. I work part-time, have a toddler, and like to look a little put together but in an easy, quick way. This fits my wardrobe needs perfectly.


The flared and bell sleeves are not my style, but the rest of the blouse definitely is. My biggest issue with this was my fabric choice; I've never sewn with challis before. I definitely stretched out that V neckline. I also had some issues with the hem, mainly due to my decision to just start sewing without going out to buy matching thread (I know) and then the fact that I misread the seam allowance and made the whole shirt shorter than intended. I need to re-sew the hem before it falls out completely. I didn't have any issues with the pattern pieces fitting together correctly or even any fit issues. Overall, it's a top that I really like. It's very comfortable and the style is easy to wear. I'm planning to make another one in a linen that I have, I just need to verify that I have enough of it first! It may end up being sleeveless, and/or colorblocked.


What I learned: The pattern itself was straightforward and fitting-wise, this was the easiest pattern I've sewn. I did learn a lot about using lightweight, easily stretched out fabrics. Stay-stitching was useless for me here; I can never get the tension quite right on my machine and I couldn't get it low enough to stop the fabric from gathering while trying to sew a line of stitches across a single layer of fabric. And as mentioned, I ended up stretching the neckline out. My project after this one was also rayon, although it was more of a gauze (post to come soon!), and I was able to keep it from having the same issues I had here by using fusible interfacing on the areas that I would have otherwise staystitched. In the future I might also try using a wash-away stabilizer, the type used for embroidery, on any areas that need extra stabilizing while sewing that I don't want to risk changing the drape of, like a center front seam. Oh, and just buy the matching thread! I do like the clean look of no visible topstitching, but my hemming job does not meet the qualifications for something that will last more than a few wears and washes.

Oh the waves on that neckline...

Thursday, September 1, 2016

Royal Quills Half Buckle

As a continuation of the DIY babywearing discussion - which, by the way, is basically running non-stop in my brain - I recently made a half-buckle carrier, aka a wrap strap mei tai with a buckle waist. Some half buckles have padded, structured waists meant to be worn on the hips, much like an SSC, but I just wanted the quickness and ease (especially for unfastening) of a buckle on the waist straps but otherwise wanted a wrap strap mei tai.


I got this beautiful Kokoskaa size 2 wrap from the Babywearing Swap on Facebook. It's a cotton/Tencel blend and was beautiful to wrap with. I almost kept it as a shorty but really wanted to make this carrier. It made me a Kokoskaa fan and a huge Tencel fan. It's soft and smooth and lovely with enough texture to keep it from being slippery, and the pattern and color are gorgeous. I used a linen that I already had in my stash for the inner panel, doubled up.


I made a test carrier to verify that my guess for the measurements would be OK. I had a tablecloth that I never ever use and don't really like. It's about 2/3 cotton, 1/3 polyester, so technically OK for babywearing but it's just very tablecloth-y if you know what I mean. It was short, so my tester had short straps, but they were actually useable. Not ideal, but useable for me - everyone is shaped and sized differently, and the wonderful thing about DIY is that you can customize to fit your own shape, size, and wrapping preferences. I chose to make my final carrier with longer straps, but I now know what I can potentially get away with.

Most of my shapes were rectangles, so I pulled threads to cut on grain
Disclaimer: I am going to explain my process in some detail. It is for reference only, it is not intended to be advice for you and/or any carrier you intend to make.


I made up the pattern myself. It makes me happier that way (although sometimes it makes me more frustrated, too). I basically used a rectangle with rounded top edges for the body of the carrier, and I traced off my Tula curves for those rounded edges. The rest of the body is not like the Tula - there are no darts and it's not the same width or length.

Making a carrier has a few basic steps - sew straps, both waist and shoulder; attach straps to carrier body; sew carrier body panels together. It doesn't need to be done in that order. I chose to make my waistband unstructured/unpadded and meant to be worn apron style, although I can wear it non-apron as well. I also chose to sew the carrier right sides together with just a single opening for turning, although many tutorials use a method that leaves separate openings for each strap. The steps I took were:


* Sew narrow waistband straps from linen (to take the place of webbing), attach buckles; female end of buckle attached with x-box, male end threaded (correctly threaded! - it took me more than one try) onto longer strap


* Sew shorter, wider waistband "straps," approx 3" x 4.5" finished size. I could have done a separate waistband that extended wider than the panel and skipped this step, but I chose to just make the panel longer and have short waistband straps. You have to measure the narrowest part of your waist where you might wear this to be sure your straps/buckles/webbing won't be too small or too large around your waist. My test carrier clued me in to this.

* Stitch narrow waist straps onto wider straps by laying the narrower ones on top of the wider, centered, with the female buckle half extending just off the end of the wider strap and lining up the ends that will be inside the body panel

* Cut taper on longer strap. They started out as one taper from wrap cut in half, so one was longer than the other and both were angled the same direction. Lay shorter strap on top of longer strap, right sides together, and (while adding seam allowance) cut longer strap at same angle. They will now mirror each other.

* Hem shoulder straps on both long edges and one short edge


* Pleat shoulder straps to 4.5" wide (find center of strap, fold one edge to the center then fold back towards outer edge so fold meets center and hemmed edge is about 1/2" from folded edge; repeat on other side; repeat both steps on other strap)


* Arrange all straps on top of outer body panel (wrap fabric panel), right sides together, so the appropriate amount of strap (the part that will be seen on the outside when completed) is pointing "into" the body panel and the rest (which will be in the seam allowance) is pointing "out" of the panel.
   * To line up the waist straps, I marked with pins on the body panel where I wanted the bottom corner of the straps to be, 1.5" up from the bottom (for seam allowance plus .5") and 1" from the edge (seam allowance):

   * Then I marked with pins on the straps how far I wanted to sink them into the carrier/how far I wanted them to stick out (I left about 4.5" of the wider waistband part sticking out of the body panel when it was all completed) and lined up those pins with the pins on the body panel:


   * Then I pinned them in place. The pins used to line them up were taken out or they'd be in the way when it came time to sew everything together.


* Place inner body panels (linen) on top of the straps and pin everything in place. I rolled up the shoulder straps to keep them out of the way - they created a busty little carrier ;)


Might be a little hard to see, but the left side of this shows the basting stitches that keep everything aligned, right side has normal stitch length
* Stitch around the entire carrier leaving a good opening for turning (5" or so) - I prefer to stitch up to the opening, backstitch, stitch forward again to the opening, then baste across that space, change back to regular stitch length, do a few stitches, backstitch, and keep going. That way, I know my opening edges are lined up, it gives me a good line to press open that seam, and I can just pull out those basting stitches when I need to open it up and the stitches on either side of the opening are still reinforced so they don't pop open when I pull everything right side out.

* Turn everything right side out, press

* Sew X-boxes for reinforcement over the strap ends inside the carrier

* Top stitch around the carrier

* If I'm feeling crazy some day, I'll slipstitch the opening closed instead of just letting the topstitching keep it closed.


My carrier is about 18" wide x 19" high at the inner strap edge (then has a slight curve up in the center). It fits my almost-2-year-old very well, and I can adjust how far up the panel comes between us to get her arms in or arms out, but she usually prefers arms out. The wrap straps are nice - they give extra support around her and I can spread them out and adjust them on my shoulders to spread out the pressure of carrying a 30 lb child. The finished straps are 73" at the short taper.


It rolls up nicely, too.


Sunday, June 12, 2016

Step Onto the Road Nursery


Many of the unblogged projects I created in the last 2 years were for J's nursery. This was a rough inspiration board, and I'm really happy with the final product. Most of the rooms in our house are semi-decorated and most of our rooms have pieces that we're just trying to make work. Since we were starting from scratch here, I was able to be thoughtful about everything we did.

Idea board


The items we actually used are on this Pinterest board. (Some, not all.)

I really wanted to include a variety of patterns and textures along with a variety of natural items. I found a salt lamp online, for example, and not only did I love how it looked and the color coordinated with the rest of the room, the reddish light it gives off supposedly creates less sleep disturbance when you have to turn on a light in the middle of the night. Win win. We even got one for our room.


We painted the walls with Benjamin Moore's Palest Pistachio. It's a really, really soft green that I love. I had some issues with fabric because online shopping doesn't always give you a good idea of colors, and one fabric in particular was SO different in person from how it looked online that it could have been an entirely different fabric. It didn't work at all. I did use the coral and white print above for the single curtain, and I sewed new covers from the blue and green upholstery fabric for a glider passed down from my in-laws.


I made this mobile. It's hung from a cup hook in the ceiling, way too high for her to reach.  The colors aren't quite right with the rest of the room, but they're pretty so oh well. My mom gave me a bunch of her old craft supplies and there was a ton of glitter, so I made do with what I had. I used wooden beads (I think they're beads?) from the craft store, glittered them, and added several coats of clear acrylic to make sure we didn't have glitter raining down on our baby. The center sparkly bit was something I got from my grandma's things after she passed away - I don't know where it came from, but it works well for a mobile. The other crystal bit is an old chandelier crystal from an antique store. This was really fun to make!


I made this "Be brave" banner at a craft night at our church the summer before J was born. It was very simple to make, just black Sharpie stenciled onto burlap triangles glued onto twine. Unfortunately, it's no longer hanging in her room because she can now reach it, and one morning when I went in to get her out of bed, she was holding it. I'd like to put it back up somewhere out of toddler reach.


My sister-in-law painted this for us. It fit in so well with the room and we love it. I'm still working on finding or making something small to hang underneath it to balance out this grouping. Even here there are works in progress...


This print is from The Wheatfield on Etsy. It hangs right in front of her door, so we see it every time we enter the room. While I'm not an "outdoorsy" person, I do love nature and being in it, and hopefully we can instill in our daughter some of that love of going out, seeing things, and being in nature.

Monday, May 16, 2016

Current To-Dos, May 2016

I have a few projects that are on my short list, all of which will be very useful this summer.


I bought this oh-so-soft rayon from IndieSew not too long ago. It's a loose, almost gauzy weave. It's very lightweight and I imagine will be very nice to wear on a hot day. I'm really leaning towards buying the Sutton Blouse pattern by True Bias, but I might see if I have something else I already own that will work well. I want something with sleeves so it's more work-appropriate but I need something that works with my yardage, too.


Well, that's not an exciting picture, but I also bought this olive twill on a whim to get free shipping for my last fabric order. I'm going to make a pair of short based on the Colette Clover pattern. I've done it before but they're weren't super wearable. I'm hoping to learn enough from the Craftsy pants sloper class to nail it this time.


And finally, I bought this coral rayon challis (link) to make another summery top. There will be more info on this in a few weeks or so. I'm very happy with this fabric so far. It washed up very nicely. I haven't started cutting it or anything, so we'll see how it behaves, but so far so good.

I feel like I'm getting a better sense of what types of patterns and fabrics work for me lately, even though I haven't been sewing much. I've slowly been working through the Wardrobe Architect series from Colette Patterns and have been trying to be very mindful of what I buy. My fabric stash is mainly fabric that I have very specific plans for or really, really like. I could probably minimize it even more, but I'm not quite ready for that.

Monday, May 9, 2016

I won a giveaway!

I entered the Itch to Stitch Birthday Giveaway after reading about it on Scruffy Badger's blog. To my surprise, I won! The grand prize was a lovely bundle of fabrics, The Shirtmaking Workbook, 3 Craftsy classes, gift certificates to Girl Charlee, Upcraft Club, and Indie Sew, plus a gift certificate to The Fabric Store in LA which I'm dying to visit when we take our Disneyland/LA vacation this fall.

The fabrics:


Dolce & Gabbana boiled wool printed with butterflies and flowers
I have about 2.5 yards of this fabric. The reverse is a marled gray knit. I'm not totally sold on the floral, but I could always use it wrong side out and then the print would take the place of a fun lining (which wouldn't be needed). I do like the colors, though, so maybe I'll use it right side out. Still undecided on this.

Inspiration:
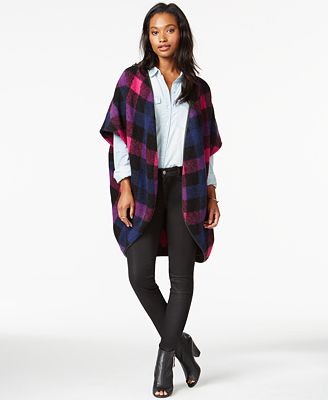
Cocoon poncho
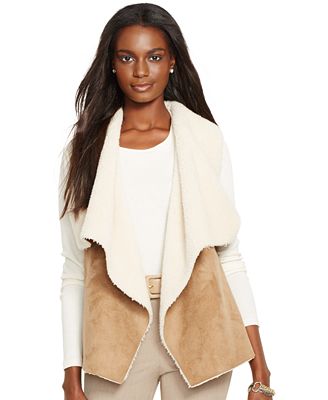
Draped vest
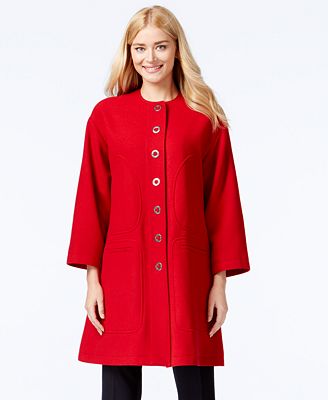
Swing coat


I think any of these styles would work with the wool. The vest would work well with the double-faced fabric but I'm not sure if it's a style I'd wear often. The poncho would be super cozy and would be a way to use the print that I'd be comfortable with. The coat would probably have to be shorter, but I think the wool would lend itself to a simple, unlined style like this.


Wrong side
Chanel matelasse
This fabric is just fun. It's not what I think of when I think of matelasse; it's sort of a crinkled/pleated texture with metallic dots in a random pattern all over it. I'm thinking of making this into a skirt. The structure is unlike anything I've sewn with before, so I'm still debating the best way to work with it. It's times like this when a dress form would come in handy (along with some idea of how to drape and create patterns.) Anyways, this is a fabric I'll hang onto, but it's not at the top of my to-use list.


Viscose challis
I want to make this into a cute set of summer PJs. Again, this print isn't totally my style; although I really like it, I can't see it fitting into my daily wardrobe. I'd love a pair of matching PJs, though, and this lightweight challis would be cool and comfy for summer.

I have tendencies to hoard things, so I haven't used all my credits, but I did sign up for and start the Beginner Serging Craftsy class by Amy Alan, and just signed up for the Suzy Furrer Patternmaking & Design: The Pants Sloper class. I picked out the Mila shirt pattern by Itch to Stitch and the Archer by Grainline from Indie Sew (one of my new favorite shops). I also got the Jacqueline jacket pattern by Itch to Stitch (Kennis makes some cute patterns!) and the Satya romper pattern by Jennuine Design from Upcraft Club. Upcraft Club was very helpful when I (hoarder-like) didn't use my credit quickly enough and let me use it anyways - thank you! I was introduced to some great sewing resources, especially for indie sewing patterns, through this giveaway and now my sewing to-do list has at least doubled!

And now I am off to spend what's left of naptime dyeing a piece of fabric to sew into an onbu carrier.

Monday, May 2, 2016

Babywearing Sewing

My daughter has wanted to be held a LOT since she was born. Babywearing has been a huge help. I have under-utilized it for sure, but I've learned a lot along the way. I've recently sewn/started sewing my own babywearing gear for fun and to save money.

The first thing I made was a linen ring sling, but I just don't think ring slings are for us. I gave it to a friend.

Then, I recently sewed up a reverse onbuhimo. This page from BWI is a good quick overview of types of baby carriers. An onbuhimo is similar to a meh dai (and I love a good meh dai), but, instead of separate waist straps, it has rings at the bottom of the panel that the shoulder straps go through; a reverse onbuhimo has rings at the shoulders and straps at the bottom of the panel that thread up through the rings.

I used half of a Mahogany brand jacquard tablecloth (originally 60x120), dyed it, and sewed it up. After the fabric was washed and dried, it measured 28" by 104". I only used the tablecloth fabric for the basic construction (no internal panel). I used bar tacking for reinforcement on the shoulder straps. The shoulder straps are actually too long - I haven't bothered to shorten them, but the rings end up right around my armpit which is much lower than I'd like. The waist band is shown as two pieces below but I actually just cut one long piece and sewed it into the body panel with multiple rows of topstitching across it all. I lost a bit of length that way but I have more than enough length in the straps. I never use them for reinforcing passes - the point of using an onbuhimo, for us, is for quick use. Put it on, tighten the straps, done.

I also cut two 12" x 12" pieces of fleece for shoulder padding and two 6" x 7" pieces of fleece for leg padding; two pairs of small aluminum rings from slingrings.com were used on the straps. I used 1/2" seam allowances on the straps, 1" seam allowance on the body.


I used a variety of sources for my basic construction. The only part I did differently than the other full tutorials I've seen online was the shoulder strap construction. I've seen similar commercial carriers, and it's similar to using webbing on a buckle carrier but with fabric. I made two tubes (from the 4" x 18" pieces in the diagram) that I attached the rings onto. Then I stitched those along the full length of the shoulder straps. For the padded shoulder straps, I did this:

  • Fold each fleece shoulder padding piece in quarters to make two 3" x 12" pieces
  • Tack each end with a few stitches to keep fleece in shape
  • Lay one padding piece on the wrong side of one shoulder strap, aligning edges with the seam allowance and the center of shoulder strap, 1/2" from the end
  • Stitch down the center of the padding to secure it in place
  • Fold shoulder strap right sides together; sew along long edge and one short edge (just outside of the padding)
  • Clip corners, turn right side out, smoothing out fleece as needed; topstitch along three edges leaving the end with raw edges open
  • (Next step would be to attach ring straps)

I used my presser foot to stitch just to the side of the fleece
This method of padding the straps saves you from having to stuff the fleece into a tube of fabric. As far as the double-strap idea, I didn't like the idea of just having a tiny strap holding the rings onto the shoulder straps, either aesthetically or mechanically, and since I added padding, it would be a little trickier to attach the rings directly to the shoulder straps. I think you could just end the padding sooner, then wrap the unpadded portion over the rings and stitch securely in place, either with an x-box or with 3 lines of stitching like you'd use on a ring sling.

Finished reverse onbuhimo:

Right side - as seen when worn

Inside
I also have a wrap that I bought to convert to a wrap-strap meh dai, then decided to create a half-buckle instead, but am not quite ready to make. I really love the wrap - Kokoskaa Royal Quill Gilia, a Tencel blend - and although I just don't think I'll get as much use out of a shortie as I would a HB, I really don't want to mess it up. I have no extra wrap if something is off on my measurements. I just started cutting up a tablecloth I had but don't like to test out my size, shape, etc. This is the "muslin" stage of making a carrier.

I also have a carrier waiting for me at the post office. I wasn't home to sign for it - I hate when that happens! Now it's the weekend so I have to wait until Monday to pick it up. Finger crossed it will be a replacement for my Tula (which is OK but I don't love), and then I can sell the Tula. I'll probably put that up for sale as is, but if it doesn't sell, I might dye it and make it a little more interesting. As if I need another project. The question there is what direction to take it - my top theme contenders are Peter Pan, Wicked (possibly a Peter Pan/Wicked dual option although that's an odd mashup when you say it together), Luna Lovegood, or a rainbow galaxy dye. I think the Luna will take too much time but is my favorite idea. Of course, I might end up doing something else entirely. We'll see.