I have a few projects that are on my short list, all of which will be very useful this summer.
I bought this oh-so-soft rayon from IndieSew not too long ago. It's a loose, almost gauzy weave. It's very lightweight and I imagine will be very nice to wear on a hot day. I'm really leaning towards buying the Sutton Blouse pattern by True Bias, but I might see if I have something else I already own that will work well. I want something with sleeves so it's more work-appropriate but I need something that works with my yardage, too.
Well, that's not an exciting picture, but I also bought this olive twill on a whim to get free shipping for my last fabric order. I'm going to make a pair of short based on the Colette Clover pattern. I've done it before but they're weren't super wearable. I'm hoping to learn enough from the Craftsy pants sloper class to nail it this time.
And finally, I bought this coral rayon challis (link) to make another summery top. There will be more info on this in a few weeks or so. I'm very happy with this fabric so far. It washed up very nicely. I haven't started cutting it or anything, so we'll see how it behaves, but so far so good.
I feel like I'm getting a better sense of what types of patterns and fabrics work for me lately, even though I haven't been sewing much. I've slowly been working through the Wardrobe Architect series from Colette Patterns and have been trying to be very mindful of what I buy. My fabric stash is mainly fabric that I have very specific plans for or really, really like. I could probably minimize it even more, but I'm not quite ready for that.
Monday, May 16, 2016
Monday, May 9, 2016
I won a giveaway!
I entered the Itch to Stitch Birthday Giveaway after reading about it on Scruffy Badger's blog. To my surprise, I won! The grand prize was a lovely bundle of fabrics, The Shirtmaking Workbook, 3 Craftsy classes, gift certificates to Girl Charlee, Upcraft Club, and Indie Sew, plus a gift certificate to The Fabric Store in LA which I'm dying to visit when we take our Disneyland/LA vacation this fall.
The fabrics:
Dolce & Gabbana boiled wool printed with butterflies and flowers
I have about 2.5 yards of this fabric. The reverse is a marled gray knit. I'm not totally sold on the floral, but I could always use it wrong side out and then the print would take the place of a fun lining (which wouldn't be needed). I do like the colors, though, so maybe I'll use it right side out. Still undecided on this.
Inspiration:
Chanel matelasse
This fabric is just fun. It's not what I think of when I think of matelasse; it's sort of a crinkled/pleated texture with metallic dots in a random pattern all over it. I'm thinking of making this into a skirt. The structure is unlike anything I've sewn with before, so I'm still debating the best way to work with it. It's times like this when a dress form would come in handy (along with some idea of how to drape and create patterns.) Anyways, this is a fabric I'll hang onto, but it's not at the top of my to-use list.
Viscose challis
I want to make this into a cute set of summer PJs. Again, this print isn't totally my style; although I really like it, I can't see it fitting into my daily wardrobe. I'd love a pair of matching PJs, though, and this lightweight challis would be cool and comfy for summer.
I have tendencies to hoard things, so I haven't used all my credits, but I did sign up for and start the Beginner Serging Craftsy class by Amy Alan, and just signed up for the Suzy Furrer Patternmaking & Design: The Pants Sloper class. I picked out the Mila shirt pattern by Itch to Stitch and the Archer by Grainline from Indie Sew (one of my new favorite shops). I also got the Jacqueline jacket pattern by Itch to Stitch (Kennis makes some cute patterns!) and the Satya romper pattern by Jennuine Design from Upcraft Club. Upcraft Club was very helpful when I (hoarder-like) didn't use my credit quickly enough and let me use it anyways - thank you! I was introduced to some great sewing resources, especially for indie sewing patterns, through this giveaway and now my sewing to-do list has at least doubled!
And now I am off to spend what's left of naptime dyeing a piece of fabric to sew into an onbu carrier.
The fabrics:
Dolce & Gabbana boiled wool printed with butterflies and flowers
I have about 2.5 yards of this fabric. The reverse is a marled gray knit. I'm not totally sold on the floral, but I could always use it wrong side out and then the print would take the place of a fun lining (which wouldn't be needed). I do like the colors, though, so maybe I'll use it right side out. Still undecided on this.
Inspiration:
 |
| Cocoon poncho |
 |
| Draped vest |
 |
| Swing coat |
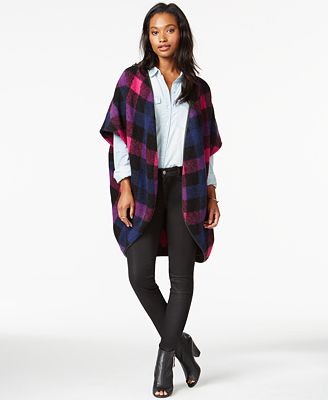
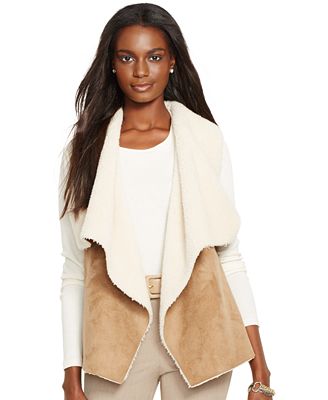
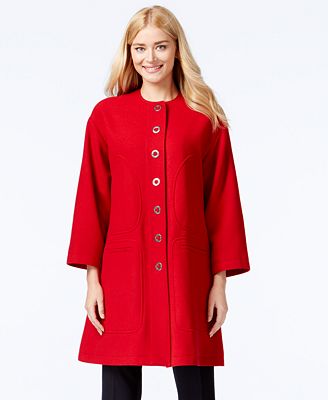
I think any of these styles would work with the wool. The vest would work well with the double-faced fabric but I'm not sure if it's a style I'd wear often. The poncho would be super cozy and would be a way to use the print that I'd be comfortable with. The coat would probably have to be shorter, but I think the wool would lend itself to a simple, unlined style like this.
 |
| Wrong side |
This fabric is just fun. It's not what I think of when I think of matelasse; it's sort of a crinkled/pleated texture with metallic dots in a random pattern all over it. I'm thinking of making this into a skirt. The structure is unlike anything I've sewn with before, so I'm still debating the best way to work with it. It's times like this when a dress form would come in handy (along with some idea of how to drape and create patterns.) Anyways, this is a fabric I'll hang onto, but it's not at the top of my to-use list.
Viscose challis
I want to make this into a cute set of summer PJs. Again, this print isn't totally my style; although I really like it, I can't see it fitting into my daily wardrobe. I'd love a pair of matching PJs, though, and this lightweight challis would be cool and comfy for summer.
I have tendencies to hoard things, so I haven't used all my credits, but I did sign up for and start the Beginner Serging Craftsy class by Amy Alan, and just signed up for the Suzy Furrer Patternmaking & Design: The Pants Sloper class. I picked out the Mila shirt pattern by Itch to Stitch and the Archer by Grainline from Indie Sew (one of my new favorite shops). I also got the Jacqueline jacket pattern by Itch to Stitch (Kennis makes some cute patterns!) and the Satya romper pattern by Jennuine Design from Upcraft Club. Upcraft Club was very helpful when I (hoarder-like) didn't use my credit quickly enough and let me use it anyways - thank you! I was introduced to some great sewing resources, especially for indie sewing patterns, through this giveaway and now my sewing to-do list has at least doubled!
And now I am off to spend what's left of naptime dyeing a piece of fabric to sew into an onbu carrier.
Monday, May 2, 2016
Babywearing Sewing
My daughter has wanted to be held a LOT since she was born. Babywearing has been a huge help. I have under-utilized it for sure, but I've learned a lot along the way. I've recently sewn/started sewing my own babywearing gear for fun and to save money.
The first thing I made was a linen ring sling, but I just don't think ring slings are for us. I gave it to a friend.
Then, I recently sewed up a reverse onbuhimo. This page from BWI is a good quick overview of types of baby carriers. An onbuhimo is similar to a meh dai (and I love a good meh dai), but, instead of separate waist straps, it has rings at the bottom of the panel that the shoulder straps go through; a reverse onbuhimo has rings at the shoulders and straps at the bottom of the panel that thread up through the rings.
I used half of a Mahogany brand jacquard tablecloth (originally 60x120), dyed it, and sewed it up. After the fabric was washed and dried, it measured 28" by 104". I only used the tablecloth fabric for the basic construction (no internal panel). I used bar tacking for reinforcement on the shoulder straps. The shoulder straps are actually too long - I haven't bothered to shorten them, but the rings end up right around my armpit which is much lower than I'd like. The waist band is shown as two pieces below but I actually just cut one long piece and sewed it into the body panel with multiple rows of topstitching across it all. I lost a bit of length that way but I have more than enough length in the straps. I never use them for reinforcing passes - the point of using an onbuhimo, for us, is for quick use. Put it on, tighten the straps, done.
I also cut two 12" x 12" pieces of fleece for shoulder padding and two 6" x 7" pieces of fleece for leg padding; two pairs of small aluminum rings from slingrings.com were used on the straps. I used 1/2" seam allowances on the straps, 1" seam allowance on the body.
I used a variety of sources for my basic construction. The only part I did differently than the other full tutorials I've seen online was the shoulder strap construction. I've seen similar commercial carriers, and it's similar to using webbing on a buckle carrier but with fabric. I made two tubes (from the 4" x 18" pieces in the diagram) that I attached the rings onto. Then I stitched those along the full length of the shoulder straps. For the padded shoulder straps, I did this:
This method of padding the straps saves you from having to stuff the fleece into a tube of fabric. As far as the double-strap idea, I didn't like the idea of just having a tiny strap holding the rings onto the shoulder straps, either aesthetically or mechanically, and since I added padding, it would be a little trickier to attach the rings directly to the shoulder straps. I think you could just end the padding sooner, then wrap the unpadded portion over the rings and stitch securely in place, either with an x-box or with 3 lines of stitching like you'd use on a ring sling.
Finished reverse onbuhimo:
I also have a wrap that I bought to convert to a wrap-strap meh dai, then decided to create a half-buckle instead, but am not quite ready to make. I really love the wrap - Kokoskaa Royal Quill Gilia, a Tencel blend - and although I just don't think I'll get as much use out of a shortie as I would a HB, I really don't want to mess it up. I have no extra wrap if something is off on my measurements. I just started cutting up a tablecloth I had but don't like to test out my size, shape, etc. This is the "muslin" stage of making a carrier.
I also have a carrier waiting for me at the post office. I wasn't home to sign for it - I hate when that happens! Now it's the weekend so I have to wait until Monday to pick it up. Finger crossed it will be a replacement for my Tula (which is OK but I don't love), and then I can sell the Tula. I'll probably put that up for sale as is, but if it doesn't sell, I might dye it and make it a little more interesting. As if I need another project. The question there is what direction to take it - my top theme contenders are Peter Pan, Wicked (possibly a Peter Pan/Wicked dual option although that's an odd mashup when you say it together), Luna Lovegood, or a rainbow galaxy dye. I think the Luna will take too much time but is my favorite idea. Of course, I might end up doing something else entirely. We'll see.
The first thing I made was a linen ring sling, but I just don't think ring slings are for us. I gave it to a friend.
Then, I recently sewed up a reverse onbuhimo. This page from BWI is a good quick overview of types of baby carriers. An onbuhimo is similar to a meh dai (and I love a good meh dai), but, instead of separate waist straps, it has rings at the bottom of the panel that the shoulder straps go through; a reverse onbuhimo has rings at the shoulders and straps at the bottom of the panel that thread up through the rings.
I used half of a Mahogany brand jacquard tablecloth (originally 60x120), dyed it, and sewed it up. After the fabric was washed and dried, it measured 28" by 104". I only used the tablecloth fabric for the basic construction (no internal panel). I used bar tacking for reinforcement on the shoulder straps. The shoulder straps are actually too long - I haven't bothered to shorten them, but the rings end up right around my armpit which is much lower than I'd like. The waist band is shown as two pieces below but I actually just cut one long piece and sewed it into the body panel with multiple rows of topstitching across it all. I lost a bit of length that way but I have more than enough length in the straps. I never use them for reinforcing passes - the point of using an onbuhimo, for us, is for quick use. Put it on, tighten the straps, done.
I also cut two 12" x 12" pieces of fleece for shoulder padding and two 6" x 7" pieces of fleece for leg padding; two pairs of small aluminum rings from slingrings.com were used on the straps. I used 1/2" seam allowances on the straps, 1" seam allowance on the body.
I used a variety of sources for my basic construction. The only part I did differently than the other full tutorials I've seen online was the shoulder strap construction. I've seen similar commercial carriers, and it's similar to using webbing on a buckle carrier but with fabric. I made two tubes (from the 4" x 18" pieces in the diagram) that I attached the rings onto. Then I stitched those along the full length of the shoulder straps. For the padded shoulder straps, I did this:
- Fold each fleece shoulder padding piece in quarters to make two 3" x 12" pieces
- Tack each end with a few stitches to keep fleece in shape
- Lay one padding piece on the wrong side of one shoulder strap, aligning edges with the seam allowance and the center of shoulder strap, 1/2" from the end
- Stitch down the center of the padding to secure it in place
- Fold shoulder strap right sides together; sew along long edge and one short edge (just outside of the padding)
- Clip corners, turn right side out, smoothing out fleece as needed; topstitch along three edges leaving the end with raw edges open
- (Next step would be to attach ring straps)
 |
| I used my presser foot to stitch just to the side of the fleece |
Finished reverse onbuhimo:
 |
| Right side - as seen when worn |
 |
| Inside |
I also have a carrier waiting for me at the post office. I wasn't home to sign for it - I hate when that happens! Now it's the weekend so I have to wait until Monday to pick it up. Finger crossed it will be a replacement for my Tula (which is OK but I don't love), and then I can sell the Tula. I'll probably put that up for sale as is, but if it doesn't sell, I might dye it and make it a little more interesting. As if I need another project. The question there is what direction to take it - my top theme contenders are Peter Pan, Wicked (possibly a Peter Pan/Wicked dual option although that's an odd mashup when you say it together), Luna Lovegood, or a rainbow galaxy dye. I think the Luna will take too much time but is my favorite idea. Of course, I might end up doing something else entirely. We'll see.
Subscribe to:
Comments (Atom)


